Thursday 26 February 2015

Validation

Android Layout XML file

Let us create an layout xml file with two EditText field one for entering email-id and other for password.
<LinearLayout xmlns:android="http://schemas.android.com/apk/res/android"
    xmlns:tools="http://schemas.android.com/tools"
    android:layout_width="match_parent"
    android:layout_height="match_parent"
    android:background="#F0F0F0"
    android:orientation="vertical" >

    <TextView
        android:layout_width="wrap_content"
        android:layout_height="wrap_content"
        android:padding="10dp"
        android:text="@string/lbl_register"
        android:textAllCaps="true"
        android:textAppearance="?android:attr/textAppearanceLarge"
        android:textColor="#176CEC"
        android:textStyle="bold" />

    <EditText
        android:id="@+id/editText_email"
        android:layout_width="match_parent"
        android:layout_height="wrap_content"
        android:background="#fff"
        android:ems="10"
        android:hint="@string/lbl_email_hint"
        android:inputType="textEmailAddress"
        android:padding="12dp" />

    <EditText
        android:id="@+id/editText_password"
        android:layout_width="match_parent"
        android:layout_height="wrap_content"
        android:layout_marginTop="1dp"
        android:background="#fff"
        android:ems="10"
        android:hint="@string/lbl_password_hint"
        android:inputType="textPassword"
        android:padding="12dp" />

    <Button
        android:id="@+id/btn_signup"
        android:layout_width="match_parent"
        android:layout_height="wrap_content"
        android:layout_margin="20dp"
        android:background="#176CEC"
        android:text="@string/lbl_btn_signup"
        android:textAppearance="?android:attr/textAppearanceLarge"
        android:textColor="#fff"
        android:textStyle="bold" />

</LinearLayout>

Android Layout XML file

package com.javatechig;

import java.util.regex.Matcher;
import java.util.regex.Pattern;
import android.app.Activity;
import android.os.Bundle;
import android.view.View;
import android.view.View.OnClickListener;
import android.widget.EditText;

public class MainActivity extends Activity {
 private EditText emailEditText;
 private EditText passEditText;

 @Override
 protected void onCreate(Bundle savedInstanceState) {
  super.onCreate(savedInstanceState);
  setContentView(R.layout.activity_main);

  emailEditText = (EditText) findViewById(R.id.editText_email);
  passEditText = (EditText) findViewById(R.id.editText_password);

  findViewById(R.id.btn_signup).setOnClickListener(new OnClickListener() {

   @Override
   public void onClick(View arg0) {

    final String email = emailEditText.getText().toString();
    if (!isValidEmail(email)) {
     emailEditText.setError("Invalid Email");
    }

    final String pass = passEditText.getText().toString();
    if (!isValidPassword(pass)) {
     passEditText.setError("Invalid Password");
    }

   }
  });
 }

 // validating email id
 private boolean isValidEmail(String email) {
  String EMAIL_PATTERN = "^[_A-Za-z0-9-\\+]+(\\.[_A-Za-z0-9-]+)*@"
    + "[A-Za-z0-9-]+(\\.[A-Za-z0-9]+)*(\\.[A-Za-z]{2,})$";

  Pattern pattern = Pattern.compile(EMAIL_PATTERN);
  Matcher matcher = pattern.matcher(email);
  return matcher.matches();
 }

 // validating password with retype password
 private boolean isValidPassword(String pass) {
  if (pass != null && pass.length() > 6) {
   return true;
  }
  return false;
 }
}

Wednesday 25 February 2015

Notification tab of speed lock

package com.cssoft.speedlocker;

import com.cssoft.fonts.MyFonts;
import com.cssoft.validation.Validations;
import com.cssoft.webservices.Login_User;

import android.app.Activity;
import android.content.Intent;
import android.os.Bundle;
import android.text.style.TtsSpan.TextBuilder;
import android.view.View;
import android.view.Window;
import android.widget.Button;
import android.widget.EditText;
import android.widget.TextView;
import android.widget.Toast;

public class LoginActivity extends Activity {

private TextView txt_username, txt_password, txt_forgot;
private EditText edit_username, edit_password;
private Button btn_login;
private Validations valid;

@Override
protected void onCreate(Bundle savedInstanceState) {
requestWindowFeature(Window.FEATURE_NO_TITLE);
super.onCreate(savedInstanceState);
setContentView(R.layout.activity_login);

valid = new Validations(LoginActivity.this);

getUI();
setFonts();
clickEvents();

}

private void getUI() {
txt_username = (TextView) findViewById(R.id.txt_login_username);
txt_password = (TextView) findViewById(R.id.txt_login_password);
txt_forgot = (TextView) findViewById(R.id.txt_login_forgot);
edit_username = (EditText) findViewById(R.id.edit_login_username);
edit_password = (EditText) findViewById(R.id.edit_login_password);
btn_login = (Button) findViewById(R.id.btn_login);
}

private void setFonts() {
txt_username.setTypeface(MyFonts.RobotoMedium(LoginActivity.this));
txt_password.setTypeface(MyFonts.RobotoMedium(LoginActivity.this));
txt_forgot.setTypeface(MyFonts.RobotoMedium(LoginActivity.this));
edit_username.setTypeface(MyFonts.RobotoMedium(LoginActivity.this));
edit_password.setTypeface(MyFonts.RobotoMedium(LoginActivity.this));
btn_login.setTypeface(MyFonts.RobotoMedium(LoginActivity.this));
}

private void clickEvents() {

txt_forgot.setOnClickListener(new View.OnClickListener() {

@Override
public void onClick(View v) {
startActivity(new Intent(LoginActivity.this,
ForgotActivity.class));
overridePendingTransition(R.anim.zoomin, R.anim.fadeout);

}
});

btn_login.setOnClickListener(new View.OnClickListener() {

@Override
public void onClick(View v) {
String username = edit_username.getText().toString().trim();
String password = edit_password.getText().toString().trim();
if (!valid.isEmpty(username)) {
Toast.makeText(getApplicationContext(), "Enter Username",
Toast.LENGTH_SHORT).show();
} else if (!valid.isEmpty(password)) {
Toast.makeText(getApplicationContext(), "Enter Password",
Toast.LENGTH_SHORT).show();
} else {
Toast.makeText(getApplicationContext(), "OK",
Toast.LENGTH_SHORT).show();

new Login_User(LoginActivity.this).execute(username,
password);

}

}
});

}
}

Monday 23 February 2015

Web Services

Web service is a method of communication between two electronic devices over a network. It is a software function provided at a network address over the Web with the service always on as in the concept of utility computing. The W3C defines a Web service generally as:-
a software system designed to support interoperable machine-to-machine interaction over a network
Most Web services do not adopt this complex architecture.[citation needed] This article describes it in more detail.
The W3C also states:
We can identify two major classes of Web services:
  • REST-compliant Web services, in which the primary purpose of the service is to manipulate representations of Web resources using a uniform set of statelessoperations.
  • Arbitrary Web services, in which the service may expose an arbitrary set of operations

Monday 16 February 2015

Progress bar

The following code example shows how a progress bar can be used from a worker thread to update the user interface to notify the user of progress:
 public class MyActivity extends Activity {
     private static final int PROGRESS = 0x1;

     private ProgressBar mProgress;
     private int mProgressStatus = 0;

     private Handler mHandler = new Handler();

     protected void onCreate(Bundle icicle) {
         super.onCreate(icicle);

         setContentView(R.layout.progressbar_activity);

         mProgress = (ProgressBar) findViewById(R.id.progress_bar);

         // Start lengthy operation in a background thread
         new Thread(new Runnable() {
             public void run() {
                 while (mProgressStatus < 100) {
                     mProgressStatus = doWork();

                     // Update the progress bar
                     mHandler.post(new Runnable() {
                         public void run() {
                             mProgress.setProgress(mProgressStatus);
                         }
                     });
                 }
             }
         }).start();
     }
 }
To add a progress bar to a layout file, you can use the <ProgressBar> element. By default, the progress bar is a spinning wheel (an indeterminate indicator). To change to a horizontal progress bar, apply the Widget.ProgressBar.Horizontal style, like so:
<ProgressBar
     style="@android:style/Widget.ProgressBar.Horizontal"
     ... />

Friday 13 February 2015

time picker

In order to use TimePicker class, you have to first define the TimePicker component in your activity.xml. It is define as below −
<TimePicker
   android:id="@+id/timePicker1"
   android:layout_width="wrap_content"
   android:layout_height="wrap_content" />


After that you have to create an object of TimePicker class and get a reference of the above defined xml component. Its syntax is given below.
import android.widget.TimePicker;
private TimePicker timePicker1;
timePicker1 = (TimePicker) findViewById(R.id.timePicker1);

In order to get the time selected by the user on the screen, you will use getCurrentHour() and getCurrentMinute() method of the TimePicker Class. Their syntax is given below.
int hour = timePicker1.getCurrentHour();
int min = timePicker1.getCurrentMinute();

Thursday 12 February 2015

Select image from gallery and camera

First; user having two choice – take photo from camera and Choose from library; the user will need to choose any one option from list. Then depending on the option chosen by the user, we will either open the gallery or capture an image from the camera. 
Step 1
Open "AndroidManifest" and add the following code to it: 
<manifest xmlns:android="http://schemas.android.com/apk/res/android"
    package="com.chhavi.uploadingandviewimage"
    android:versionCode="1"
    android:versionName="1.0" >

  <uses-permission android:name="android.permission.CAMERA" />
  <uses-feature android:name="android.hardware.camera" />
  <uses-feature android:name="android.hardware.camera.autofocus" />
  <uses-permission android:name="android.permission.WRITE_EXTERNAL_STORAGE" />

  <uses-sdk
      android:minSdkVersion="7"
      android:targetSdkVersion="16" />

  <application
      android:allowBackup="true"
      android:icon="@drawable/ic_launcher"
      android:label="@string/app_name"
      android:theme="@style/AppTheme" >
    <activity
        android:name="com.chhavi.uploadingandviewimage.MainActivity"
        android:label="@string/app_name" >
      <intent-filter>
        <action android:name="android.intent.action.MAIN" />

        <category android:name="android.intent.category.LAUNCHER" />
      </intent-filter>
    </activity>
  </application>
</manifest> 
Note the permission "WRITE_EXTERNAL_STORAGE" is to save the image captured to the gallery. "CAMERA" permissions enables use of the camera of your Android phone.
Step 2:
Open "activity_main" and add the following code to it:
<LinearLayout xmlns:android="http://schemas.android.com/apk/res/android"
              xmlns:tools="http://schemas.android.com/tools"
              android:id="@+id/LinearLayout1"
              android:layout_width="match_parent"
              android:layout_height="match_parent"
              android:orientation="vertical"
              android:padding="10dp" >

  <LinearLayout
          android:layout_width="match_parent"
          android:layout_height="wrap_content"
          android:gravity="center"
          android:padding="5dp" >

    <Button
            android:id="@+id/btnSelectPhoto"
            android:layout_width="match_parent"
            android:layout_height="wrap_content"
            android:text="Select Photo" />

  </LinearLayout>

  <LinearLayout
          android:layout_width="match_parent"
          android:layout_height="match_parent"
          android:orientation="vertical"
          android:padding="10dp" >

    <ImageView
            android:id="@+id/viewImage"
            android:layout_width="match_parent"
            android:layout_height="wrap_content"
            android:src="@drawable/camera" />

  </LinearLayout>

</LinearLayout> 
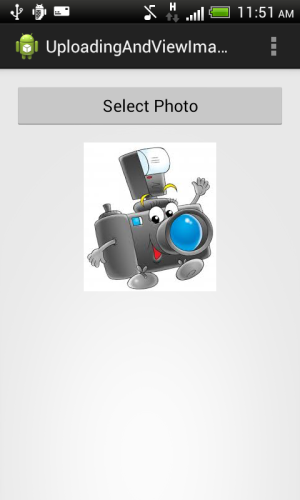
The layout looks like:
im1.jpg
 Later the selected image will be displayed in the ImageView.
Step 3:
Open "MainActivity" and add the following code to it: 
package com.chhavi.uploadingandviewimage;

import android.app.AlertDialog;
import android.content.DialogInterface;
import android.content.Intent;
import android.database.Cursor;
import android.graphics.Bitmap;
import android.graphics.BitmapFactory;
import android.net.Uri;
import android.os.Bundle;
import android.app.Activity;
import android.os.Environment;
import android.provider.MediaStore;
import android.util.Log;
import android.view.Menu;
import android.view.View;
import android.widget.Button;
import android.widget.ImageView;
import java.io.File;
import java.io.FileNotFoundException;
import java.io.FileOutputStream;
import java.io.IOException;
import java.io.OutputStream;

public class MainActivity extends Activity {

    ImageView viewImage;
    Button b;

    @Override
    protected void onCreate(Bundle savedInstanceState) {
        super.onCreate(savedInstanceState);
        setContentView(R.layout.activity_main);
        b=(Button)findViewById(R.id.btnSelectPhoto);
        viewImage=(ImageView)findViewById(R.id.viewImage);
        b.setOnClickListener(new View.OnClickListener() {
            @Override
            public void onClick(View v) {
                selectImage();
            }
        });
    }

    @Override
    public boolean onCreateOptionsMenu(Menu menu) {
        // Inflate the menu; this adds options to the action bar if it is present.
        getMenuInflater().inflate(R.menu.main, menu);
        return true;
    }

      private void selectImage() {

        final CharSequence[] options = { "Take Photo""Choose from Gallery","Cancel" };

        AlertDialog.Builder builder = new AlertDialog.Builder(MainActivity.this);
        builder.setTitle("Add Photo!");
        builder.setItems(options, new DialogInterface.OnClickListener() {
            @Override
            public void onClick(DialogInterface dialog, int item) {
                if (options[item].equals("Take Photo"))
                {
                    Intent intent = new Intent(MediaStore.ACTION_IMAGE_CAPTURE);
                    File f = new File(android.os.Environment.getExternalStorageDirectory(), "temp.jpg");
                    intent.putExtra(MediaStore.EXTRA_OUTPUT, Uri.fromFile(f));
                    startActivityForResult(intent, 1);
                }
                else if (options[item].equals("Choose from Gallery"))
                {
                    Intent intent = new   Intent(Intent.ACTION_PICK,android.provider.MediaStore.Images.Media.EXTERNAL_CONTENT_URI);
                    startActivityForResult(intent, 2);

                }
                else if (options[item].equals("Cancel")) {
                    dialog.dismiss();
                }
            }
        });
        builder.show();
    }

    @Override
    protected void onActivityResult(int requestCode, int resultCode, Intent data) {
        super.onActivityResult(requestCode, resultCode, data);
        if (resultCode == RESULT_OK) {
            if (requestCode == 1) {
                File f = new File(Environment.getExternalStorageDirectory().toString());
                for (File temp : f.listFiles()) {
                    if (temp.getName().equals("temp.jpg")) {
                        f = temp;
                        break;
                    }
                }
                try {
                    Bitmap bitmap;
                    BitmapFactory.Options bitmapOptions = new BitmapFactory.Options();

                    bitmap = BitmapFactory.decodeFile(f.getAbsolutePath(),
                            bitmapOptions); 
                   
                    viewImage.setImageBitmap(bitmap);

                    String path = android.os.Environment
                            .getExternalStorageDirectory()
                            + File.separator
                            + "Phoenix" + File.separator + "default";
                    f.delete();
                    OutputStream outFile = null;
                    File file = new File(path, String.valueOf(System.currentTimeMillis()) + ".jpg");
                    try {
                        outFile = new FileOutputStream(file);
                        bitmap.compress(Bitmap.CompressFormat.JPEG, 85, outFile);
                        outFile.flush();
                        outFile.close();
                    } catch (FileNotFoundException e) {
                        e.printStackTrace();
                    } catch (IOException e) {
                        e.printStackTrace();
                    } catch (Exception e) {
                        e.printStackTrace();
                    }
                } catch (Exception e) {
                    e.printStackTrace();
                }
            } else if (requestCode == 2) {

                Uri selectedImage = data.getData();
                String[] filePath = { MediaStore.Images.Media.DATA };
                Cursor c = getContentResolver().query(selectedImage,filePath, nullnullnull);
                c.moveToFirst();
                int columnIndex = c.getColumnIndex(filePath[0]);
                String picturePath = c.getString(columnIndex);
                c.close();
                Bitmap thumbnail = (BitmapFactory.decodeFile(picturePath));
                Log.w("path of image from gallery......******************.........", picturePath+"");
                viewImage.setImageBitmap(thumbnail);
            }
        }
    }   
}

In the code above, "AlertDialog" will create a pop-up dialog box that will ask the user to choose "Take Photo", in other words capture an image from the camera or "Choose from Gallery" or "Cancel". Note that in both "Choose from Gallery" and "Take Photo", you can add any code in "startActivityForResult".
Output snapshots:
Run the application on an Android phone.
The first screen looks like:
im2f.png
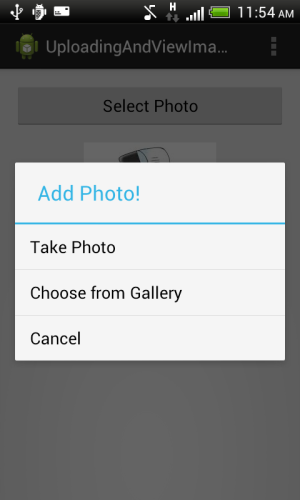
Clicking on the button "Select Photo" you will get the alert dialog box like:
im3f.png
Selecting "Take photo" will open your camera.
im4f.png
After clicking the photo, you can discard it or save it by selecting the tick mark:
im5f.png
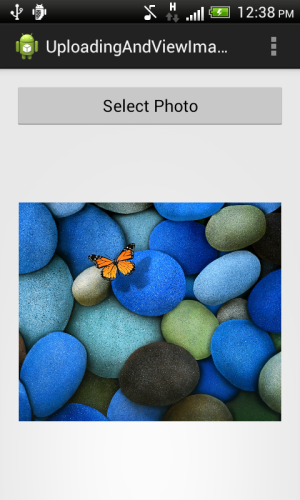
Finally the image clicked will be displayed in the ImageView.
im8f.png
Selecting "Choose from Gallery" will open your gallery (note that the image captured earlier has been added to the phone gallery).
im6f.jpg
Selecting an image from these albums will be displayed in the ImageView like:
im7f.png